Easy Dresser Makeover Before and After
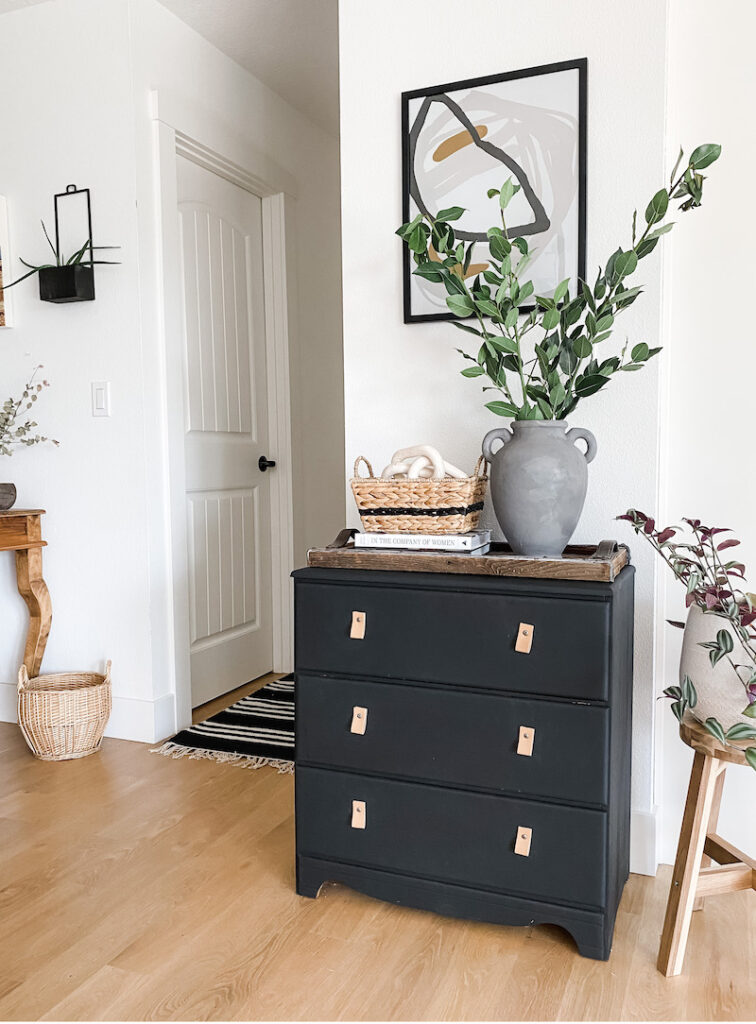
If you ask me, black paint makes just about anything look better. Recently, I updated a vintage dresser I found a few years back at a barn sale. It was too cute to pass up and seemed like it would be a good versatile furniture piece. I like using dressers as tables or cabinets in the living room areas. And although I love a natural wood dresser, this one just had one too many uneven coats of cherry stain. I took it to the next level (and challenged my craftiness by making some leather pulls to replace basic old one. Overall this was a super easy, and satisfying DIY dresser makeover!

This little beauty caught my eye – I’m always on the hunt for simple solid wood pieces. Classic cabinets like this one are easy to update and stand the test of time. Because this house had some odd little nooks and walls, I thought this mini dresser would work well for extra storage and table space.

Prep & Paint
Just like most things I like to makeover, I knew I wanted to paint this dresser black! And for furniture, my black paint of choice is milk paint. Specifically, Rustoleum Milk Paint in Eclipse. It has a nice deep, rich paint color.
Milk paint is an eco-friendly, water-based paint made from natural ingredients, offering a matte, vintage look that’s perfect for furniture makeovers. I later paint an entire piano black with this liquid gold, that’s how much I love it.
Luckily (or more accurately, why I love it), milk paint doesn’t require much prep work. That means you don’t need to completely sand it down or fix every little scratch and groove. The paint is thick and fills dings and scratches nicely. To get this cabinet paint ready, I just removed the old cheapy drawer pulls. Then, a good solid cleaning to remove any grime. I did give it a very light sanding just to rough things up a bit so it adheres even better. Because this kind of paint covers blemishes really well I don’t need to spend too much time on this step (read all about my thoughts on Milk Paint vs Chalk Paint).

Update Drawer Pulls
For this cabinet, I was going for a very organic modern vibe here. I was picturing a rich black finish with some natural type pulls – in this case, faux leather drawer pulls. I like a lot of contrast and a black cabinet helps me get there! I ended up making my own pulls which was super easy (see below), but if you just want the quicker version, these Leather Dresser Pulls look lovely!

Ok, here’s the scoop on how to make leather pulls to put the finishing touch on my dresser makeover. First, I’ll say it’s insanely easy. So much so, I’m thinking of adding them in more places now.
Leather Pull Supplies
- #10-32 Round Head Machine Screws (similar to these ones)
- Matching Screw Nuts
- 1″ wide Leather Strip (I used leftover pieces from a different project. If I was starting new, I’d look for vegan leather – which is hard to find in this size)
- Hole punch or nail
- Ruler

How to Make Leather Pulls
- First, I cut my leather strips to about 4.25″ Long
- Then, I marked a point on center about 1″ down from the top of a strip.
- Using a small hole puncher, I punched out the hole
- I then fold the strip in half and marked the hole placement for the other end of the strip and punched that hole.
- With the leather strip folded, I pushed through the machine screw so the head is facing out.
- I inserted the pull into the dresser drawer and secured it from the inside with the screw nut.
- I then just repeated for all remaining pulls.
Final Makeover
After letting the milk paint cure for a few days into a nice durable finish (super important), I attached the leather pulls by simply screwing them in. Although I skipped it here, adding a protective wax coating is optional, but it’s a great way to seal the paint. I can always add this later or apply more wax coats if needed.
The simple, handmade pulls added the perfect finishing touch to the fresh new look. I love this little cabinet and have moved it around to try it in a few different areas in our home.

I’m so happy with how this little dresser makeover turned out—it’s amazing what a bit of milk paint and a few DIY details can do!
From the black paint color to the handmade leather pulls, it’s satisfying to take an old, worn piece and turn it into something stylish and functional. Projects like this remind me how fun and rewarding it can be to give furniture a whole new life. I hope this inspires you to tackle your own makeover—whether it’s a dresser, table, or chair, a little effort can go a long way!


