How to Make Wood Bench with Metal Legs
Anyone else love a good home DIY project that easy, functional, and beautiful? From entryways to bedrooms and tv consoles, benches are a super versatile furniture piece. I’ve made a few benches over the years and am sharing my process here. With some careful sourcing and measuring, it comes together really quickly! Check out my steps on how to make a wood bench that works well in almost any space.
This specific project is super special because it includes a piece of raw lumber salvaged from an Oak tree that my brother and I found. This plus, the metal legs he makes in his metal shop (see below for more info). Even if you’re using other materials, the steps remain the same!

You just need some sort of solid wood top (see sources below) and metal bench legs. Both are actually pretty easy to find and there are lots of options. Here in Portland, we have lots of cool lumber places that sell slabs but this one is from the same tree as my Kitchen Wood Shelves.
Wood Bench Supplies:
- Metal Bench Legs – I used 11″ wide x 18″ high Metal Bench Legs in Powder Coated Black
- Wood Slab – I used a piece of salvaged white oak. You could check your local lumber yard and there some nice finished solid wood pieces online like this Maple Bench Top or this Butcher Block
- Wax or Stain to protect wood slab
- Screws or bolts to attach the top to the base (my bench legs came with the hardware)
- Screwdriver or wrench to install the hardware
- Cordless Drill/Driver to pre-drill holes (optional but makes it easier and keeps from damaging the wood when bolts are installed) I use this Cordless Drill Set
- Ruler and pencil
Also, full disclosure: I used the bench legs from my brother’s business and where I help him with design content.

1. Prep The Bench Top
If you’re going to stain or protect the wooden top, you’ll want to do it before attaching it to the base. Make sure it dries or cures completely before attach the bench legs.
I like to keep my wood pieces natural and use furniture beeswax to protect the wood. That’s also what I used for my kitchen shelves.

2. Mark the Holes
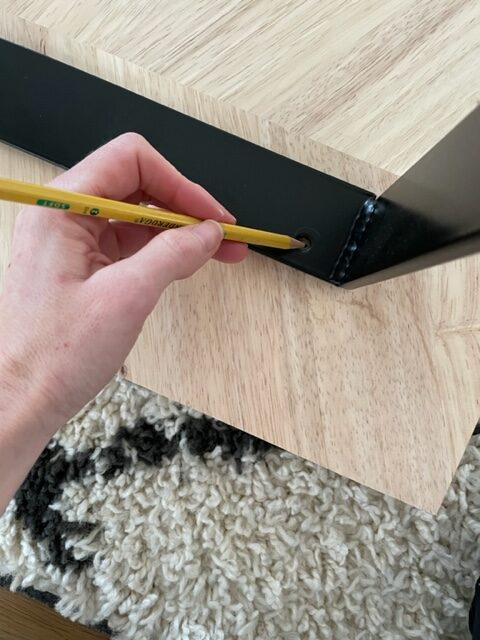
Flip over the bench top onto a soft surface so the bottom is face up to mark where to put the drill holes.
Determine how far from edge to place the bench legs. I placed my 3″ in from edge. If the legs are placed too far in from the edge, the overhang could be really weak. Using a pencil, mark where the screw holes will be.

3. Pre-drill Holes
Set aside the bench legs. Using a drill bit just smaller than the bolt or screw size, pre-drill a shallow hole into the bench top. This will make it easy to screw in the hardware and help prevent the screws or bolts from breaking. This is a good tip for most projects!

4. Attach Bench Top
With bench top still face down and the holes pre-drilled (ideally), place the bench legs so they line up with the marked placement.
Using screwdriver or wrench, attach the bench legs to the bench top being careful to not over tighten which could break bolt or strip screw. I like to attach each one leaving it not full tightened. Then once all bolts are in, I make sure the base hardware is even and adjust if needed. Once it is, I fully tighten the screws.

5. Flip Over Bench
The bench should now be complete! Check to make it’s sturdy and adjust screws if needed. I usually end up tightening them a bit.

For awhile I moved some furniture around and it also worked double duty as dining benches at the table. It was a nice change and I liked having the openness.
Where to Put a Wood Bench
Ok, once you make a wood bench, you’ll be hooked and might be wondering exactly all the places where you can put it. Here are some of my favorite plays to style a bench:
- Entryway
- Foot of bed
- Dining table
- TV Console for smaller areas
More DIY
This bench of the most asked about projects I’ve done and looks great with my DIY Coffee Table. Also, check out How to Make Wood Shelves guide for another high impact home project.
Looking for something already finished? Check out my 8 Furniture Ideas to Update Your Space.


